In this tutorial, we’ll Blink LED with 8051 Microcontroller. We have provided all circuit diagrams and code. You can also download entire project files and jump start with programming of 8051 Microcontroller. Blinking of an led could be a simple task.
We believe this tutorial is good starting point to understand how input and output works. This could be your first project. Our goal is to make you feel comfortable with 8051.If you are not clear with any mentioned text then don’t worry. In later part of this tutorial we have provided all details you need to know along with code explanation.
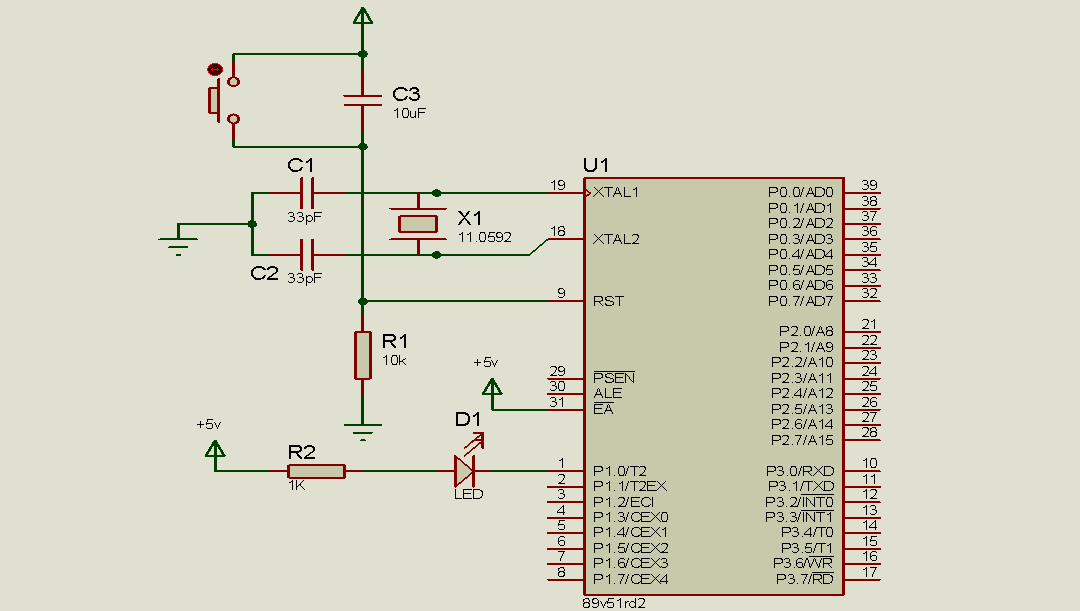
Connection Diagram: Blink LED with 8051 Microcontroller
The microcontroller used here is P89V51RD2. You can use same circuit connections for any other derivative of 8051 MCU (MCS-51 family). Resistance R1 and capacitor C3 is used for resetting controller when we give power to circuit (at startup). You can call it as power on reset. And you can always use RESET SWITCH to reset microcontroller manually at any time. When we press RESET SWITCH voltage at reset pin [Pin No: 9] goes high which resets controller. Crystal X1 and two capacitors C1 and C2 operating in parallel resonance to provide approximately 11.0592 MHz Frequency. Make connections as provided in circuit diagram after burning program into your 8051 IC. As current sinking capability of TTL logic family ICs are more than current sourcing capabilities. We have connected LED in active low mode to P1.0 Pin.
Program Code for Keil
Here is complete program/code to Blink LED with 8051 microcontroller. Please have a close look at comments which will be helpful to understand function of each line. Detail explanation of code provided right after code snippet. This program has been tested with latest version of Keil uVision.
#include<reg51.h>

sbit LED=P1^0;

void Delay()
{
int i=0,j=0;
  for(i=0;i<100;i++)
  {
    for(j=0;j<1000;j++);
  }
}

void main()
{
  while(1) //never ending loop
  {
    LED=1; //for making LED pin HIGH
    Delay();//called Delay function
    LED=0; //for making LED pin LOW
    Delay();//called Delay function
  }
}
Code Explanation
Anything written after // lines considered to be comment. And anything written in comment is not compiled. This commenting will help programmer to make their program more readable to others. Also comments are useful to quickly revised meaning of particular line of code.
#include<reg51.h>
This include statement add header file for the registers and SFRs (Special Function Registers) of 8051. This is standard header file for 8051 MCU. Which contain definitions of all registers of 8051 Microcontroller.
sbit LED=P1^0
sbit data type is useful to access single bit addressable register. It allows access to single bits of SFR (special function registers). Some of SFRs are bit addressable. We can use sbit to access individual bits of the port. As we have accessed P1.0 Pin by name LED.
void Delay()
{
   int i=0,j=0;
   for(i=0;i<100;i++)
   {
      for(j=0;j<1000;j++);
   }
}
This Delay function used to generate delay between turning LED ON and OFF continuously. In this loop first we initialized variable i and j equals to zero then we can say that for each i value inner loop for(j=0;j<1000;j++); runs for 1000 machine cycles. Means we can conclude that function Delay() runs for 100X1000=100000 machine cycles. Means this loop keeps controller busy for 1 lack machine cycle and during this period our controller does not perform any other task.
void main()
Our program execution starts from here.
while(1)
This condition always holds true so this loop is never ending loop. And as we want our LED to blink forever, we have used this loop.
This is all for this tutorial to Blink LED with 8051 Microcontroller. In next tutorial, we’ll add switch to our microcontroller project. This could be very cool experiment and we’ll learn how to configure microcontroller pin into input mode. Thank’s guys…. Please feel free to leave comments.
*More details on this article will be updated soon. Keep visiting for fresh information